How to Draw a Cat – Step-by-Step Guide for Beginners
Have you ever looked at a cute cat and thought, “I wish I could draw that”? If so, we’ll guide you through each step to help you create a cute and realistic cat drawing. Whether you are a beginner or just want a fun and relaxing activity, drawing a cat is easy and enjoyable.
Grab your pencil, and let’s get started!
Step-by-Step Guide to Drawing a Cat
Here is the step-by step guide to help you easily draw a cat:
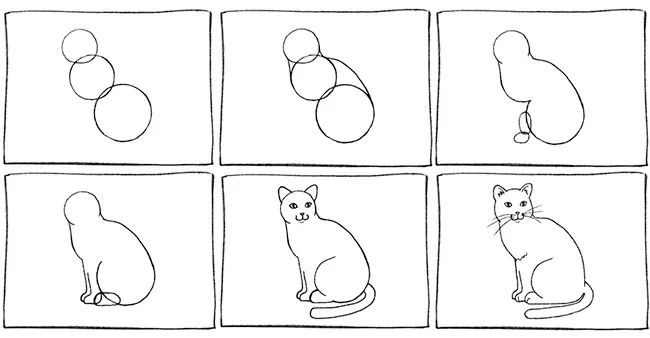
Step 1: Start with Simple Shapes
All great drawings start with basic shapes! Start by drawing a small circle for the cat’s head. Below the head, draw a larger circle for the body, then a third, even larger circle for the lower body. These circles form the basic structure of your cat.
Step 2: Connect the Shapes
Connect the circles with smooth, curving lines to shape the cat’s neck and back on the right, and another line for the neck on the left. This will help outline the general shape of the cat. Keep the lines light so you can erase and adjust them later.
Step 3: Outline the Front Legs
Erase the overlapping lines inside the cat’s body. To draw the front legs, start with an oval for the first leg overlapping the body, then a smaller oval below it. Outline the leg with smooth lines around the ovals.
Step 4: Define Back Leg
Erase the extra lines in the cat’s leg and chest. To add the second front leg, draw a line from the chest around the first leg. Then, draw an oval overlapping the front leg and bottom for the back paw. Erase any extra lines to keep the final shape of cat clean and neat.
Step 5: Sketch the Cat’s Face and Ears
Draw the cat’s pointy ears at the top of the head with two triangles, then sketch the eyes, nose, and mouth. Once the face is outlined, erase any extra lines inside the ears or around the face.
Step 6: Add the Tail and Final Details
Draw long, smooth lines from the nose for the whiskers. Next, add the tail, curving gently from the back of the body. Erase the small part where the tail connects to the body for a smooth transition. Add some wiggly fur details around the chest and ears, then erase any extra guide lines to keep the drawing clean.
Tips for Drawing a Realistic Cat
- Start Light: Start with light lines so it’s easier to adjust and erase mistakes.
Focus on - Proportions: Make sure the cat’s head, body, and legs are the right size to keep your drawing balanced.
- Add Details Slowly: Start with basic outlines, then slowly add fur texture and facial features for a more realistic look.
- Practice Regularly: The more you practice drawing cats, the easier it will be to capture their shape and personality.
Frequently Asked Questions
Q. What should I use to draw a cat?
For best results, use a pencil (preferably HB or 2B) for sketching. Once you’re happy with the drawing, you can outline it with a pen or marker.
Q. How do I make my cat drawing look more realistic?
Focus on the details like fur patterns, shadows, and the shape of the eyes and ears. Adding small textures and shading can bring your drawing to life.
Q. Can I draw a cat from memory?
Yes, absolutely! As you practice, you’ll become more familiar with the shape and features of a cat, and drawing from memory will become easier.
Q. Do I need to be an expert to draw a cat?
Not at all! Drawing a cat is easy for anyone with basic sketching skills. This guide is designed to be simple and fun, so you can enjoy the process even if you are a complete beginner.
Conclusion
Now that you’ve learned how to draw a cat step by step, it’s time to put your skills into action and let your creativity shine. Whether you are drawing for fun or improving your skills, practice is the key to every great drawing. The more you draw, the better you’ll become at capturing the charm of your feline friend. Keep practicing, and soon you’ll be able to draw not just cats, but all kinds of animals with ease!